How a BLE Tag Works
For optimal coverage on Classic or Advanced plans where tags are enabled, all employees who enter patient rooms should be registered as Users within Insights. Work with your Human Resources and/or Operations team(s) to ensure each relevant existing and new employee is registered in the app and receives a BLE tag according to your organization’s employee onboarding policies.
Jump to:
Specs
- Supports: iBeacon, Eddystone, and Sensor data
- Bluetooth: 5.0 chipset
- Range: Up to 100 meters
- Waterproof: Yes (IP65)
- Weight: 25g
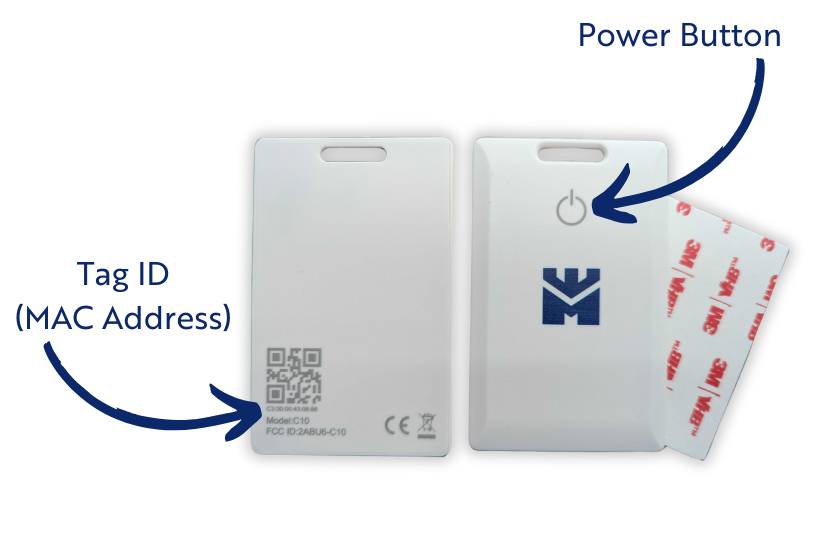
- ID: MAC Address printed in text + QR
- Compliance: FCC, CE
Details
- Each Mirador-branded tag can be clipped by the lanyard hook or attached to another surface by the included adhesive patch.
- A single tag, with claw clip attached, weighs in at only 25 grams - less than one ounce! - making it easy to wear without adding strain to clothing or lanyard wear.
- The MAC address (the original Tag ID, which cannot be changed) is printed on the back in text and QR formats.
- The POWER
 button is located on the front of the tag, just above the Mirador castle logo.
Powering Tags
A tag will need to be powered on when it is used for the first time. Ensure that the tag is "Active" in the application and assigned to a user before powering the tag on.
- To manually power on a tag, press and hold the POWER button on the tag for three seconds.
- The LED indicator on the tag will light for 5 seconds, confirming the tag is powered on.
- The tag will boot up and become visible to the Insights system. This usually takes about a minute.
- The LED indicator on the tag will flash three times to confirm that it is ready to use.

Tag Detection
- Each tag is assigned a MAC Address, which is used to communicate with the dispenser.
- The tag sends a chirp within a determined threshold via BLE. By default this is every 1 second when still, and every 0.4 seconds when the accelerometer is triggered.
- When a tag is within the dispenser's specified threshold, the dispenser logs the Tag ID, time, and date that the dispenser was used.
- When the Compliance module is enabled, point-of-care dispensers also actively scan for proximity and log the tag accordingly.
Entry and Exit Timestamps
The Check-In and Check-Out parameters are unique to the Tags page and are intended to provide users with a “snapshot” of activity for a tag when compliance activity tracking is enabled.
Entry: When a tag is first picked up by a dispenser, it is considered “checked in.” In practical terms, this means that the user (whomever is assigned to the tag) has entered a room's point-of-care zone and that the system should expect a sanitization event to register for this tag.
- The tag will stay checked in – “in the zone as part of the visit” – until it is no longer in range of the dispenser.
Exit: When a tag is no longer in range of the dispenser it will be “checked out” of the visit.
- The system will confirm whether a sanitization event occurred during the visit and assign a Missed Opportunity to the user if not.
- Tags will check out automatically after 24 hours of inactivity.
In the example Tag History report below, the visit time for this user was about 6 minutes total:

Tag Lifespan
Tags have an average lifespan of one year, meaning they will no longer “chirp” consistently enough to be used for accurate reporting after that time. Insights sets a default Lifespan of 52 weeks from the Activation Date of the tag. Both the Lifespan and Activation Date are listed in the Tag Detail for each tag.
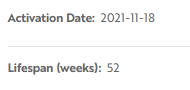
When a tag exceeds its lifespan it will be deactivated automatically. User tags must be replaced annually to ensure reporting accuracy. Notifications are sent to administrators (in app and via email) 90 days prior and up to their expiration date, which provides time for staff to re-order and assign new tags.
Related Articles